Introduction
This chapter shows how PTV xServer is used with C#. Client classes are helpful to access the web services![]() A web service represents a communication technology applied in computer networks. It provides an interface described in a machine-processable format, for example WSDL. of the xServer.
For Your convenience, the bundled clients include C# clients for the SOAP
A web service represents a communication technology applied in computer networks. It provides an interface described in a machine-processable format, for example WSDL. of the xServer.
For Your convenience, the bundled clients include C# clients for the SOAP![]() SOAP (Simple Object Access Protocol) is a protocol specification for exchanging structured information in the context of Web services. XML is used for definition of the message format, and it is based on other application layer protocols, like Hypertext Transfer Protocol (HTTP) or Simple Mail Transfer Protocol (SMTP). and the JSON
SOAP (Simple Object Access Protocol) is a protocol specification for exchanging structured information in the context of Web services. XML is used for definition of the message format, and it is based on other application layer protocols, like Hypertext Transfer Protocol (HTTP) or Simple Mail Transfer Protocol (SMTP). and the JSON![]() JSON (JavaScript Object Notation) is an open standard format for which human-readable text is used to transmit information consisting of attribute–value pairs. It is the first-address data format used for asynchronous browser/server communication (AJAX). API. How to use them is explained in the following section.
On the other hand, you can also use one of the 3 different alternatives to generate client classes using Visual Studio or .NET Framework SDK tools,
which are also described in these chapters:
JSON (JavaScript Object Notation) is an open standard format for which human-readable text is used to transmit information consisting of attribute–value pairs. It is the first-address data format used for asynchronous browser/server communication (AJAX). API. How to use them is explained in the following section.
On the other hand, you can also use one of the 3 different alternatives to generate client classes using Visual Studio or .NET Framework SDK tools,
which are also described in these chapters:
- Adding a Service Reference with Visual Studio (recommended to target current .NET framework versions if one PTV xServer service is used)
- Adding a Web Reference with Visual Studio (recommended to target .NET framework 2.0 if one PTV xServer service is used)
- Use .NET Framework SDK tools to create client classes (recommended if more than one PTV xServer service is used, regardless of the .NET framework version)
Using the bundled clients
Bundled Clients for the SOAP API
The bundled client classes can be used with .NET Framework 3.5 or higher (we recommend at least .NET Framework 4). All clients of PTV xServer can be downloaded or can be found in the subdirectory client-bundle of the PTV xServer's installation directory. C# client classes can be found in the folders dotnet/dotnet-soap-client or dotnet/dotnet-soap-client-experimental of the client-bundle.
There are two flavors available:
- If you don't want to use any experimental features of the xServer API, add all *.cs-files under folder dotnet-soap-client to your Visual Studio Solution. These classes are backward compatible to older versions, but we recommend using the client-bundle with the same version as your PTV xServer
- To use also experimental features add all *.cs-files under folder dotnet-soap-client-experimental to your Visual Studio Solution. Please note: It is required to use the same version of these experimental classes as the PTV xServer.
This code snippet shows a simple use case accessing the xRoute Service:
    var xRouteClient = new com.ptvgroup.xserver.xroute.XRouteClient();
    try
    {
        var xRouteResult = xRouteClient.calculateRoute(new com.ptvgroup.xserver.xroute.RouteRequest
        {
            waypoints = new[]
            {
                new com.ptvgroup.xserver.xroute.OffRoadWaypoint
                {
                    location = new com.ptvgroup.xserver.routing.OffRoadRouteLocation
                    {
                        offRoadCoordinate = new com.ptvgroup.xserver.geometry.Coordinate
                        { x = 6.1256572, y = 49.5983745 }
                    }
                },
                new com.ptvgroup.xserver.xroute.OffRoadWaypoint
                {
                    location = new com.ptvgroup.xserver.routing.OffRoadRouteLocation
                    {
                        offRoadCoordinate = new com.ptvgroup.xserver.geometry.Coordinate
                        { x = 6.1256572, y = 49.4816576 }
                    }
                }
            },
            // set this invalid value to see how the service answers this request (exception is thrown)
            //    storedProfile = "unknown"
        });

        System.Console.WriteLine("Calculated route distance: " + xRouteResult.distance);

    }
    catch (System.ServiceModel.FaultException<com.ptvgroup.xserver.exceptions.XServerFault> e)
    {
        System.Console.WriteLine("Got exception: " + e.Message);
        System.Console.WriteLine("Hint: " + e.Detail.hint);
    }
The C# client classes can be used as if they would have been created by a Visual Studio Service Reference. But there are some differences, which should be mentioned:
- Use the default constructor of a client service class to connect to a local instance of PTV xServer using the default port.
- If you want to connect to a remote PTV xServer instantiate the service client class by calling the constructor with string field baseUri. For example: myxServer.mydomain.com:50000.
- If any customizations are needed to instantiate the service client, it can also be created by providing the Binding and EndpointAddress
- The bundled C# classes use the same namespaces as defined in the contracts of the services (as shown by the code snippet above)
Bundled Clients for the JSON API
The bundled client classes are suitable to be used with .NET 8 (or higher). All clients of PTV xServer can be downloaded or can be found in the subdirectory client-bundle of the PTV xServer's installation directory. C# client classes can be found in the folders dotnet/dotnet-oas-client or dotnet/dotnet-oas-client-experimental of the client-bundle.
deprecated subfolder. As before these client classes still have to be used
with .NET Framework 4. They won't run with newer .NET versions like .NET 6 or 8.
There are two flavors available:
- If you don't want to use any experimental features of the xServer API, add the project file XServer.csproj and all *.cs-files under folder dotnet-oas-client to your Visual Studio Solution. These classes are backward compatible to older versions, but we recommend using the client-bundle with the same version as your PTV xServer
- To use also experimental features refer to those files of folder dotnet-oas-client-experimental. Please note: It is required to use the same version of these experimental classes as the PTV xServer.
This code snippet shows a simple use case accessing the xRoute REST![]() REST (Representational State Transfer) represents a World Wide Web paradigm, consisting of constraints to the design of components which results in a better performance and maintainability. Service:
REST (Representational State Transfer) represents a World Wide Web paradigm, consisting of constraints to the design of components which results in a better performance and maintainability. Service:
   try
    {
        // Replace this URL by the IP and port of your xServer!
        XRouteApi xRouteApi = new("http://localhost:50000");
        RouteResponse response = xRouteApi.Route(6.12496, 49.58906, 6.12271, 49.58861);
        System.Console.WriteLine("Calculated route distance: " + response.Distance);
    }
    catch (ApiException exception)
    {
        XServerError? xServerError = Newtonsoft.Json.JsonConvert.DeserializeObject<XServerError>((string)exception.ErrorContent, new ApiClient().SerializerSettings);
        Assert.IsNotNull(xServerError);
        System.Console.WriteLine("Got exception: " + xServerError.Message);

        TransformFault fault = (TransformFault) xServerError.FaultInfo;
        System.Console.WriteLine("Hint: " + fault.Hint);
    }
If you use the bundled clients or if you are already familiar with consuming web services in .NET you can skip the following sections. Otherwise, the screenshots below guide you through the steps that are necessary to create a new .NET project. We recommend using the current version of Visual Studio.
Adding a Service Reference with Visual Studio
Step 1
Select Add Service Reference... from the context menu of your recently created project.

Step 2
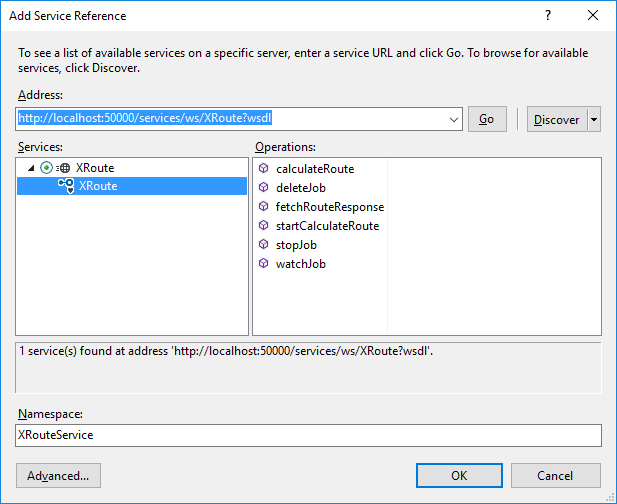
- Enter the WSDL URL of your PTV xServer service (used as example: PTV xRoute service) and click GO.
You can use the Services page to copy a valid WSDL URL. - Enter a namespace to be used for the client classes, then click OK to add the service reference to your project.
Step 3
Test the service
This is a short sample which can be used to test the PTV xRoute service:
	var xRouteClient = new XRouteClient();

	try {
		var xRouteResult = xRouteClient.calculateRoute(new RouteRequest {
			waypoints = new[] {
				new OffRoadWaypoint { location = new OffRoadRouteLocation { offRoadCoordinate = new Coordinate { x = 6.1256572, y = 49.5983745 } } },
				new OffRoadWaypoint { location = new OffRoadRouteLocation { offRoadCoordinate = new Coordinate { x = 6.1256572, y = 49.4816576 } } }
			},
			// set this invalid value to see how the service answers this request (exception is thrown)
			//storedProfile = "unknown"

		});

		System.Console.WriteLine("Calculated route distance: " + xRouteResult.distance);

	} catch (System.ServiceModel.FaultException<XServerFault> e) {

		System.Console.WriteLine("Got exception: " + e.Message);
		System.Console.WriteLine("Hint: " + e.Detail.hint);
	}
	System.Console.ReadLine();
Adding a Web Reference with Visual Studio
Step 1
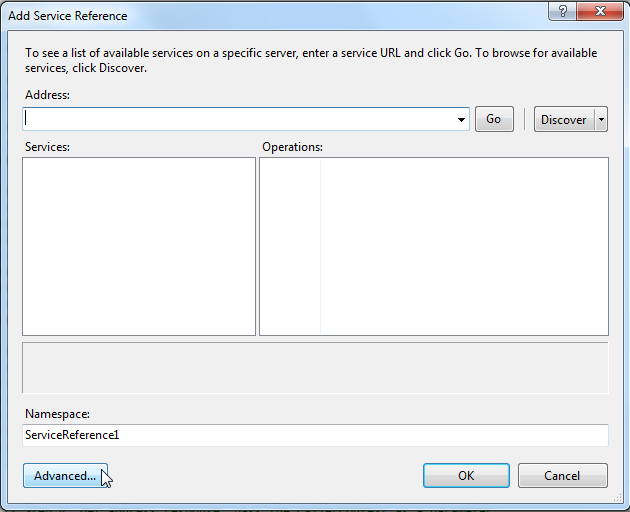
Select Add Service Reference... from the context menu of your recently created project.
Step 2
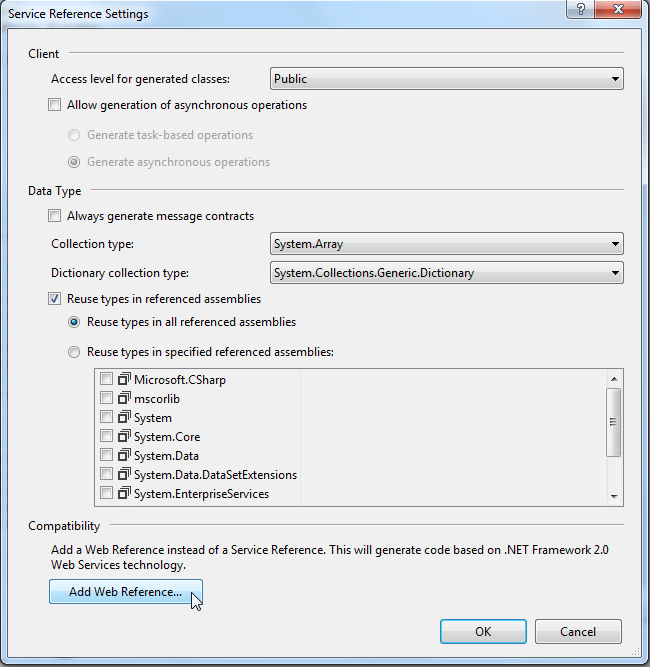
Select Advanced... in the "Add Service Reference" - dialog.
Step 3
Click Add Web Reference... in the "Service Reference Settings" - dialog.
Step 4
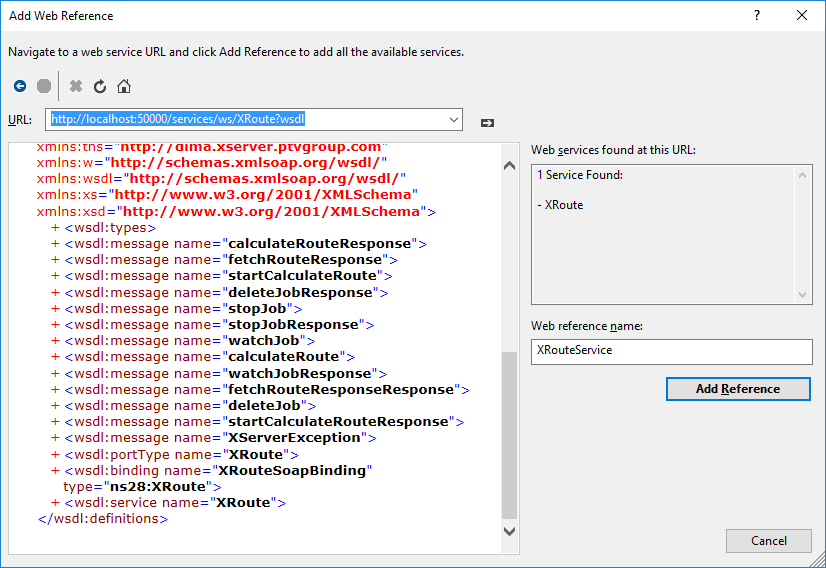
- Enter the WSDL URL of your PTV xServer service (used as example: PTV xRoute service) and enter return or click the load button.
- Give your web service a name, which is to be used as the namespace.
- Finally, click Add Reference, in order to add the service to your project.
Step 5
Test the service
This is a short sample which can be used to test the PTV xRoute service:
	var xRouteClient = new XRoute();

	try {
		var xRouteResult = xRouteClient.calculateRoute(new RouteRequest {
			waypoints = new[] {
				new OffRoadWaypoint { location = new OffRoadRouteLocation { offRoadCoordinate = new Coordinate { x = 6.1256572, y = 49.5983745 } } },
				new OffRoadWaypoint { location = new OffRoadRouteLocation { offRoadCoordinate = new Coordinate { x = 6.1256572, y = 49.4816576 } } }
			},
			// set this invalid value to see how the service answers this request (exception is thrown)
			//storedProfile = "unknown"

		});

		System.Console.WriteLine("Calculated route distance: " + xRouteResult.distance);

	} catch (System.Web.Services.Protocols.SoapException e) {

		System.Console.WriteLine("Got exception: " + e.Message);
		var detail = e.Detail.FirstChild;
		if (detail.LocalName.Equals("XServerWebFault")) {
			System.Console.WriteLine("Hint: " + detail.Attributes.GetNamedItem("hint").Value);
		}
	}
	System.Console.ReadLine();
Use .NET Framework SDK tools to create client classes
Background
When using Visual Studio for web application development, the software automatically generates the code with the corresponding proxy classes for the given data types which are related to their specific WSDL files. However, if you add multiple services (and WSDL files respectively) which share common data types, Visual Studio separately generates the proxy classes for each data type in its own namespace. Problems could arise when such a data type operates between two different services and both services use different proxy classes representing the same WSDL type.

To get around these problems the following tools included in the .NET Framework SDK can be applied:
- disco.exe - Web Services Discovery Tool (MSDN reference)
- wsdl.exe - Web Services Description Language Tool (MSDN reference)
Step 1
Related file for creating discomaps: disco.exe
In the first step, we use disco.exe to generate the so called "discomaps" which are relevant in the following step. In addition, the files will be created, downloading the specified WSDL file and saving it into the current working directory.
	C:\working_dir> disco.exe http://localhost:50000/services/ws/XRoute/?WSDL
	C:\working_dir> ren results.discomap XRoute.discomap
	C:\working_dir> disco.exe http://localhost:50000/services/ws/XTour/?WSDL
	C:\working_dir> ren results.discomap XTour.discomap
Step 2
Related file for generating code: wsdl.exe
Start wsdl.exe to generate proxy classes for the web services and the
data types. The most important parameter is the
/shareTypes
switch as described in the command line below. The generator creates
the proxy classes which are shared between the services. The
/out:
parameter specifies the file name for the generated code and the
/namespace:
parameter determines the namespace in which the classes have been
placed.
C:\working_dir> wsdl.exe /shareTypes /namespace:xserver /out:XServer.cs XRoute.discomap XTour.discomap
Step 3
Include the XServer.cs file in your project as you would do with any other files. But do
not edit this file. Otherwise, all your modifications are lost by
re-generating the file.
Create another file to add source code (e.g. convenient constructors) to the proxy classes.
Step 4
Test the service
After the last step you are ready to generate your first application connected to the corresponding PTV xServer.
This is a short sample which can be used to test the PTV xRoute service:
	var xRouteClient = new XRoute();

	try {
		var xRouteResult = xRouteClient.calculateRoute(new RouteRequest {
			waypoints = new[] {
				new OffRoadWaypoint { location = new OffRoadRouteLocation { offRoadCoordinate = new Coordinate { x = 6.1256572, y = 49.5983745 } } },
				new OffRoadWaypoint { location = new OffRoadRouteLocation { offRoadCoordinate = new Coordinate { x = 6.1256572, y = 49.4816576 } } }
			},
			// set this invalid value to see how the service answers this request (exception is thrown)
			//storedProfile = "unknown"

		});

		System.Console.WriteLine("Calculated route distance: " + xRouteResult.distance);

	} catch (System.Web.Services.Protocols.SoapException e) {

		System.Console.WriteLine("Got exception: " + e.Message);
		var detail = e.Detail.FirstChild;
		if (detail.LocalName.Equals("XServerWebFault")) {
			System.Console.WriteLine("Hint: " + detail.Attributes.GetNamedItem("hint").Value);
		}
	}
	System.Console.ReadLine();
Generating Clients for the JSON API
The JSON API of PTV xServer provides two different options for generation, WADL or OpenAPI 2.0 documents. In order to improve the quality of client generation the OpenAPI documents contain some vendor extensions. Some important notes regarding the OpenAPI Documents can be found here.
paths are currently added to the OpenAPI documents for such operations (e. g. tile).